Tips
10 Tested & Proven DIY Methods to Clean Your Silver Jewelry!
There are a number of methods to remove built-up tarnish from your silver jewelry - These 10 DIY techniques are most rated for cleaning silver jewelry:
- Baking Soda & Aluminum Foil
- Lemon & Salt Bath
- Toothpaste
- Coca Cola
- Window Cleaner
- Beer
- Ketchup
- Vinegar
- Vodka
- Laundry Detergent
We all have pieces of jewelry lying around or that we wear everyday but have neglected taking care of it. In order to keep your jewelry in its perfect silver state you must clean it and regularly take care of it. There are special products that you can buy in the store but they can be expensive and sometimes harsh, you may only need this in the toughest of tarnish situations. The best thing about silver is that it can be cleaned up using general household items and products, and we are here to find out which ones work.
After researching this topic we discovered that there were plenty of ideas but not much to prove their efficiency, so we decided to provide true and honest results of all your options.
We have tried and tested 10 different ways in which you can clean your silver using only products that you already have at home. This experiment has been done to help you choose how best to clean your silver jewelry.
First of all you should know…
What is tarnish?
Tarnish is a thin layer of corrosion that quickly forms over your silver jewelry, resulting in the formation of a dark coating that is undesirable to look at. Tarnish is basically the dulling of silver that typically occurs as a chemical reaction with hydrogen sulfide or sulfur present in the atmosphere. In most cases, some believe that the tarnish is caused by oxidation but it is not true since silver is not reactive to water or oxygen at average temperatures. Nevertheless, the metal in the alloy such as copper does tend to react with oxygen.
This is why silver is generally stored in air-restricted spaces – although since most jewelry boxes and cabinets are not airtight it still allows for the tarnishing process, just at a slower pace. In addition to the air, your silver jewelry may very well react with you skins alkaline levels. The presence of Sulphur and amino acids that can be found in perspiration can cause discoloration to your skin and jewelry. Cleaning the jewelry regularly helps to avoid this type of discoloration.
The Big Test!
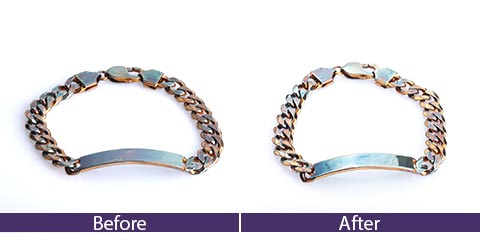
We are going to try, test and show you the results of 10 different recommended products, so that we can determine the best DIY method to cleaning silver jewelry at home. Each method will be rated out of 10 on its success PLUS we will be showing you the before and after results. Please bear in mind that we have used the toughest of tarnish situations in this test - So some of them may work better on less problematic situations.
Method #1
Baking Soda and Aluminum Foil
Add boiling water and baking soda to a bowl layered with aluminum foil. Remove after 1-3 minutes, rinse under cool water and rub dry with a soft cloth.
This process causes a chemical reaction that removes tarnish from the silver within second or minutes.
Results
You can see the process happening and the dark, discolored piece of jewelry changing back to its original state. It is truly amazing and is by far our best DIY method yet.
TESTERS RATING:


 10 /10
We captured the process of cleaning our silver with baking soda and aluminium - so here is the video for you to see for yourself the amazing process and results.
These are the things you will need:
- A soup bowl (any vessel of size that you need for the items you are de-tarnishing)
- Aluminum foil
- Boiling water
- 1 tablespoon of baking soda for each cup of water
- Spoon/kitchen tongs
- A dry cleaning cloth
Here is a step by step of how to work this amazing technique:
- Bring the water to a boil – it should be enough water to reach the top of the bowl
- Take your soup bowl/vessel and line it with aluminum foil, shiny side up
- Add 1 tablespoon of baking soda with each cup of water into the bowl and be prepared that the solution will bubble.
- Instantly place the silver jewelry in the dish, it can be one or more pieces as long as it fits in the bowl. Ensure that the jewelry is touching the aluminum foil – this is an essential part of the process for the chemical reaction to occur
- Leave in the solution for 2-5 minutes. If the level of tarnishing is really bad then you can leave it in up to 10 minutes.
- Remove the jewelry with a pair of kitchen tongs or a spoon. Rinse under cool water. You may then shine it with the dry cleaning cloth. Prepare to be amazed!

Method #2
Lemon and Salt Bath
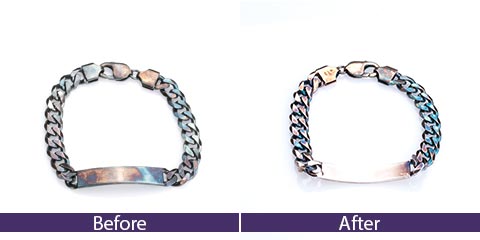
Squeeze a lemon into a bowl with 3 tablespoons of salt and hot water and placed the tarnished bracelet to rest in there for 5 minutes. Remove and rub with soft cloth.
Results
The tarnish was tough to remove using this solution with a regular cloth - It hurt my fingers rubbing. After the experiment with the regular cloth I took a white silver cleaning cloth, which really helped in lifting the tarnish. This would only be efficient if you have a silver cleaning cloth, it is too much effort with a regular cloth and does not bring perfect results.
Method #3
Toothpaste
Take a pea sized amount of toothpaste on a dish and rub into the silver using a dish washing sponge. Rinse in warm water.
Results
The toothpaste removed some of the tarnish but only slightly and not enough to make a fully successful difference. It came off in patches rather than fading the entire piece. Using a toothbrush to try give it some extra friction and get into those more intricate spaces like the links of the bracelet proved a better system in terms of removal, but it scratched the silver so I wouldn’t recommend this method.

Method #4
Coca Cola
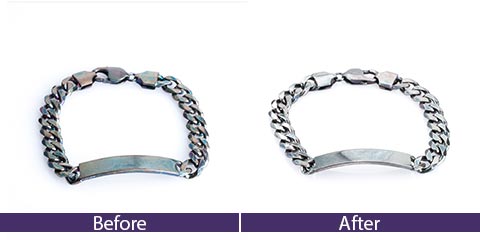
Pour some coca cola into a bowl and soak the jewelry in it for 10 minutes - remove and rub with a cloth.
Results
I really expected the coca cola to strip the silver clean but unfortunately the effect was minimal and not worth the time spent.
Method #5
Window Cleaner
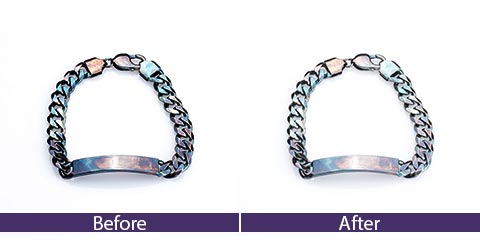
Spray the window cleaner onto a soft cloth and rub silver.
Results
The silver is shinier but no color improvement at all. This product is great to use after you have cleaned your jewelry as it gives it a nice shine.
Method #6
Beer
Pour a cup of beer into a bowl and soak the jewelry in there for 5-10 minutes. Remove and rub clean with a cloth.
Results
This method did not provide perfect results but it definitely lifted the shade a touch lighter. I certainly expected more from this considering how many times I have heard it mentioned as a successful silver cleaning method. That being said I could see a difference, just not good enough to wear.

Method #7
Ketchup
Squeeze a small amount of ketchup onto a toothbrush and rub into the silver.
Results
I could see a slight difference but it was not as successful as I had hoped for. Also it is a bit messy and smells unpleasant, just for that I would recommend against it.

Method #8
Vinegar
Soak the jewelry in a bowl of vinegar, then dip the cloth and rub the jewelry with the cloth.
Results
After all that has been said of this method it was not even closely effective as expected. You could see a slight difference but not enough that the jewelry was even wearable.

Method #9
Vodka
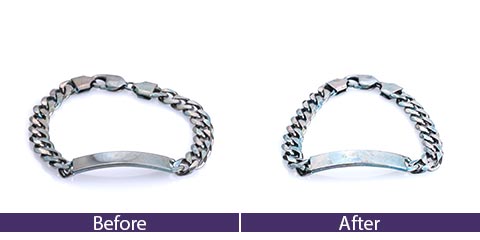
Pour a cup of vodka into a bowl and soak the silver jewerly for 5 minutes. Dip a cloth into the vodka, remove jewelry and rub with cloth.
Results
Not as effective as expected but lifted the tarnish slightly on larger area of silver but not much on the chain.
Method #10
Laundry Detergent
Pour one small cup of detergent into a bowl of hot water and place the silver jewelry inside. Leave for 5 minutes, remove and rub with a soft cloth.
Results
The laundry detergent reacts with the water creating a foamy substance a little like how the baking soda reacts, but much foamier. We decided to use the Vanish type of detergent, knowing that it is a popular product and hoping that it would be more effective. It does not remove tough tarnish stains but it does lift the darkness and it cleans any dirt or gunk from the jewelry - plus it smells great!
Prevention of tarnishing
Are you wondering if there is prevention to the cause of tarnishing? Well there are some steps you can take to help avoid the chemical reaction that causes this corrosive layer on your silver jewelry.
- Gently rub a small amount of conditioner into the material and blend with a soft cloth. This polishes the silver and protects it.
- Place some chalk into the box or drawer of where your jewelry is stored. Chalk absorbs the moisture in the air, essentially stalling the Sulphur components from reaching the silver.
- You should make an effort to regularly clean your jewelry – regular cleaning protects it from discoloration.
- Try not to swim in chlorinated pools or clean using bleach or ammonia containing products, while wearing your silver jewelry.
Summary
To summarize, there are two single fantastic methods to cleaning silver jewelry, which are using baking soda with Aluminum foil and the other being a silver cleaning solution such as ‘Silvo’. The products you get from the store are fantastic, producing amazing results, but it should only be used in the toughest of tarnish situations. This type of product usually strips a layer of the silver leaving you with a fresh new surface of silver. Luckily for us we can use our #1 method to clean our jewelry, which is just as successful and less expensive.
After doing this research experiment we have come to the conclusion that a white ‘silver cleaning’ cloth is one of the best instruments that you could have in possession for cleaning your silver products. We did not use this in the experiment as we expect that most people do not have them at home, however after some of the methods were tried and tested, we used the silver cleaning cloth to see if it helped remove the tarnish any further. In some cases it really did make a difference. Even after the best method of the baking soda and aluminum, you can use the silver cleaning cloth to just give it an extra shine.
You can purchase a white ‘Silver Cleaning’ cloth from a silver selling store, cobblers or online stores.
* Disclosure
Usually tarnish can take a while to build-up on silver. For this experiment we used pure oxide in order to quickly increase the tarnishing process on the jewelry.


