


Tips
-
9 Rules for Accessorizing Your Wedding Dress
1. Match Your Metals
You may not realize this, but some metals look better with certain dress colors. As a general rule, ivory is best paired with gold since it highlights the creamy tint of the fabric. For a pure white dress, choose accents in silver or platinum or with pearl detailing—gold may clash with brighter white hues. You can have your pick with a diamond-white gown—this barely off-white color looks amazing with yellow gold, rose gold, silver or pearls. If the dress you chose is already embellished with beadwork, let that dictate the colors of your accessories. For example, if your gown has silver beading, pick a necklace, bracelet or earrings with a silver base.
2. Remember: Less Is More
You don't need a veil, tiara, earrings, necklace and a sash. Accessories add a unique touch to your look, but even one too many can be over-the-top with an already-embellished gown. Before you start buying, take an inventory of your gown's stand-out features and then base your choices around them. If your dress has an ornate neckline, opt for a pair of drop earrings instead of a necklace (that might look too busy). For a gown with a simpler style, try a bold statement necklace or a fascinator. When it comes to earrings, take a cue from your hairstyle. If you're leaving your hair down and over your ears, small studs or drops will do. But for an updo, you might want something a little more dramatic, like a pair of chandelier danglers. And lastly, it's always a good idea to avoid designs that closely mimic the embellishments on your gown—you don't want to look too matchy-matchy.
3. Know Your Veils
The veil is the iconic bridal accessory. From flirty birdcages and ornate mantillas to regal cathedral-length styles, there's no shortage of options. But there are a few things you should keep in mind as you narrow down the type of veil you plan to wear:
- You'll want your veil to match the exact shade of your gown. Color blocking is better left to your day-to-day look.
- Be mindful when choosing a style. If your dress has a lot going on, stick with something simple that won't steal the spotlight.
- If showing off the back of your dress is a must—say you have gorgeous embroidery or beading—choose a sheer veil rather than one with two layers of tulle.
- Consider your size: Longer waltz or floor-length veils will elongate a petite frame while mid-length styles, like fingertip or elbow-length veils, can visually cut you in half, making them a better pick for taller brides. Short styles, like a birdcage or bandeau, work for all shapes and sizes and lend a fun, retro vibe to your gown.
4. Top It Off
Veils not really your thing? From combs to fascinators, there are plenty of other ways to top off your look. Choose your hairstyle before you pick your accessory, since some types will look better with updos than others. A flower crown, for example, is best with loose locks. You should also consider your hair type—dainty accessories may be perfect for fine hair, but won't be as noticeable with thick waves. Most importantly, make sure whatever you pick feels secure while you're moving around.
5. Think Beyond Earrings
Looking for a super-simple way to add a bit of personality to your wedding dress (and help create the illusion of curves)? Add a belt or sash. Just because your dress doesn't come with one, doesn't mean it won't look great—a fashionable fastener is an easy way to customize your gown and change its look without having to make expensive alterations. And whether you go with a classic satin sash or a metallic leather belt, it'll give your dress an instant upgrade. The key to choosing the right waist-cincher is to find one that works with your body type. Thin belts are best suited to short torsos, while wider belts work well with longer ones. If you're an apple shape, think about a beaded or heavily embellished belt to flatter your midsection. If you're petite, a belt with V-shape appliqué will elongate your body. As a general rule, stick with a style that's no more than three-inches wide—you don't want to overpower the rest of your gown.
6. Keep It Comfy
No outfit is complete without the perfect pair of shoes—and your wedding day look is no exception. Of course you'll want a killer pair to go with that gorgeous dress, but that doesn't mean you have to compromise on comfort. Don't forget: You'll be standing for long periods of time, and you don't want to be cringing in pain before you've even hit the dance floor. While shopping, consider the height of the heel (obviously the taller you go, the higher the pain potential), the type of straps and the material. Your feet need to be well supported (think: ankle and toe straps over slip-ons) to avoid instability. Look for high quality, natural materials. They're infinitely more comfortable than synthetic ones and are also a lot more durable, meaning you'll be able to wear them again.
For the best fit, go shopping at the end of the day, when your feet are swollen from activity, and give yourself plenty of time to break in your new kicks before the wedding. Wear them around the house a couple weeks prior to the day, noting any areas that are prone to blisters. To make your shoes more comfortable, consider buying moleskin, heel grips, strap stickers or gel insoles designed specifically for heels. Shoes too strappy to conceal an insole or grip? Pick up a spray, wax or cream that protects against friction or provides anti-inflammatory pain relief to keep your feet happy.
7. Cover It Up
A stylish cover-up is a must if you're getting married during the cooler months or at a house of worship that requires you to cover your shoulders. From boleros to capelets and fur stoles, the options are endless. The key is to choose one that strikes the perfect balance with your gown. Simple, understated styles can be paired with more embellished cover-ups, like a beaded capelet with scalloped edges or a bold sequined or feather bolero for added personality. For already ornate gowns, try a more minimal accent to avoid looking too over-the-top. A delicate lace jacket, sheer tulle cape or a chiffon wrap will keep you warm without competing with your gown. Another option? A classic cardigan, the perfect complement to a rustic or more laid-back affair.
8. Consider Your Décolletage
Pairing your neckline style with the proper adornment can add character to your wedding gown, or even highlight a unique feature. Follow these simple guidelines:
Sweetheart or strapless: For something a little different, skip the necklace and focus on an elegant pair of chandelier earrings instead. Wear clear crystal for a sleek look, or add punch with a hint of color. Try using a meaningful gem, like your birthstone, or pick a hue from the flowers in your bridal bouquet. If you're going for a flirty, fresh look, include two or three small fresh or silk flowers in your hair to add a soft, organic feel. Vintage elegance more your style? Pay homage to the past with an art-deco-style bracelet or some Roaring Twenties–inspired feather barrettes.
V-neck: Whether you opt for a pendant or a choker, this style begs for a little décolletage decoration. A thin chain with a simple pendant, like a locket, is an elegant way to accessorize, while pearls (single- or double-stranded) are always a classic choice. If you're going for a more decadent look, a crystal choker or statement necklace with matching earrings could be the perfect combo.
Halter or reverse halter: For this shoulder-baring style, skip the necklace and focus on dressing up your tresses. Headbands are a great way to add panache to your wedding updo, be it a sleek bun or a loose ponytail. But if headbands aren't quite your style, try adding some sparkle to your hair with intricate crystal hairpins. If you've got a curly mane, five to seven hairpins is the perfect number, while brides with thinner locks (or shorter hair) need fewer—just two or three pins will do the trick
9. Stick to What You Know
Although it's a special day, don't stray too far from your normal style. If you rarely wear jewels, there's no need to drown yourself in diamonds on your wedding day. The goal is to look like the best, most beautiful version of your regular self.
-
7 Easy Ways to Perfectly Accessorize Every Dress You Own
t's party time! You've got your dress all picked out, but it's the jewelry that's really going to make or break your look. It's a big night and you want to make a big statement, but depending on what you're wearing, a jeweled belt or bold cuff could be a better bet than your favorite go-to necklace. And whether you choose to wear a little jewelry or a lot, you want to make sure that you are putting the emphasis in the right place. Here are a few tips for accessorizing every dress:
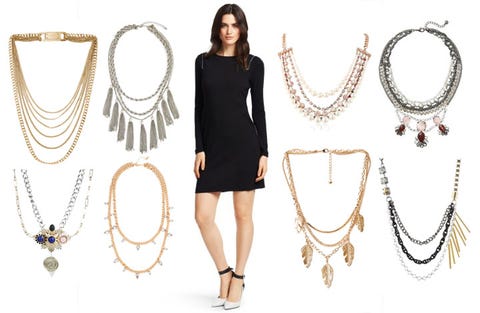
1. Deep V — Pendant Necklace
A deep V provides the perfect frame for a longer pendant necklace. Just make sure the chain isn't so long that the necklace gets lost in your cleavage!
2. Sweetheart — Short Statement Necklace
A sweetheart neckline is a great frame for a bold statement necklace. Just make sure it is a little on the shorter side so it draws the attention up to your face and doesn't overlap with your cleavage.

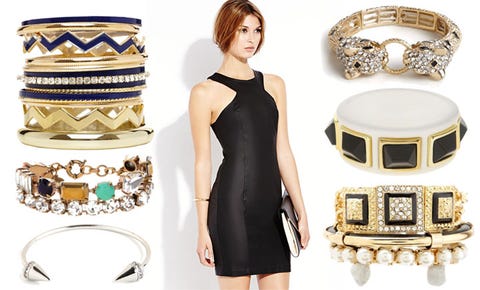
3. Halter — Layered Bracelets
Halter dresses already have a lot going on up top so a large necklace or too-big earrings can crown your face and make the look feel busy. Instead, try giving your exposed arms a little attention by stacking some fun bracelets.
4. Tank — Ear Cuff and Layered Rings
There's something super cool and casual about a good tank dress, but you don't want to interrupt those loose flowing lines with a bunch of heavy jewelry. An ear cuff is great for drawing attention up towards your face and some cool layered rings help balance out your look without making it too busy.

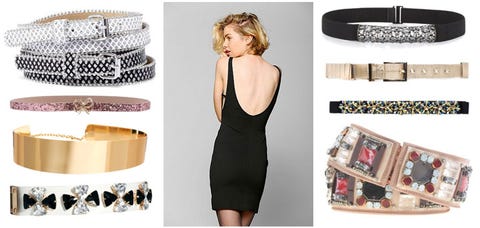
5. Backless — Fancy Waist Belt
Who says belts aren't be jewelry? A metal or jeweled waist belt will help break up the front of the dress without stealing focus from the main attraction — your beautiful, exposed back.
6. Crew Neck — Layered Necklaces
With your upper body all covered up, you need something to break up your look. Large statement necklaces can start to feel a little heavy, but layered necklaces allow more of the dress to show through, adding interest to your upper body without completely dominating your outfit.
7. One-shoulder — Bold Cuff
One-shoulder dresses are supposed to look and feel uneven, but even so it's a good idea to balance them out with a bold cuff on the wrist opposite the shoulder strap. Earrings can be a nice touch too, as long as there is no embellishment on the shoulder, which would compete with earrings and make the overall look appear lopsided.

-
Does Real Gold Tarnish?
Gold is one of the least reactive chemical elements. Gold alone or pure gold does not combine easily with oxygen so it stays shiny, it does not rust nor tarnish, again, that is pure gold.

Gold tarnishing is the slight corrosion of the gold surface and is evident as a dark discoloration of the gold item, also called a tarnish film. If you search online, some will say that real gold tarnishes while others will say that real gold does not tarnish. So we decided to write this blog to help provide information without the confusing answers or terms.
Gold is one of the least reactive chemical elements. Gold alone or pure gold does not combine easily with oxygen so it stays shiny, it does not rust nor tarnish, again, that is pure gold. In jewelry, it is rare to find a piece that contains only the pure gold element. Pure gold or 24 karat gold is too soft to be used in jewelry so it is usually alloyed with other base metals altering its properties. It is these other base metals alloyed with gold that actually reacts with or to oxygen, sulfur and moisture that eventually tarnish your gold jewelry.
The higher the karat of a gold jewelry is, the less likely it is to tarnish, wherein 24 karat gold cannot tarnish. In general, tarnishing is mostly seen in jewelry that has lower gold karat and is usually seen in items that have less than 14 karats of gold. Little tarnishing may be observed in 14 karat gold jewelries and very seldom in 18 karat gold.
When your gold jewelry tarnishes, it doesn’t mean that it’s not real gold; it is not just pure gold or 24 karat gold. Real gold jewelry can eventually tarnish. There are even rare circumstances in which jewelry containing high karats of gold have tarnished but by and large the higher the percentage of gold in the alloy, the less likely that the gold piece will tarnish. When lower karat gold jewelry tarnishes, it does so in a much slower phase than sterling silver. Here are some of the common reasons that will trigger or hasten gold tarnishing:
Common causes of tarnishing
Oxygen and sulfur compounds mixing with moisture are the most common cause of tarnishing. Our body chemistry also differs that is why some people’s jewelry may be more inclined to tarnish or tarnish more quickly than other individuals. Other influences that may also contribute to tarnishing of even higher gold karat like 14 karat or 18 karat jewelry is the consistent exposure to high amounts of chemicals such as perfume, hairspray, deodorants and cleaning stuff like chlorine and detergents.
Another surprising cause of tarnishing is food items with high levels of acidity or sulfur compounds. Some items that can aid in tarnishing are onions, fruit juices, spices and pickled items.
Preventive Steps
- If you want to keep your gold jewelry looking its best for a long time, avoid the items mentioned above.
- Make sure to remove your jewelry also even when just washing your hands. Soap can leave your gold jewelry with a dull finish little by little and eventually, it becomes harder to clean when soap suds have already built up.
- Store your gold jewelry properly and separately or in compartments to avoid them from scratching each other. You may add a packet of silica gel inside the usual jewelry box so it absorbs any moisture in the box.
Blackening of 21 and 22 karat gold items have been reported but are a very unusual cases and really unexpected. Experts can only infer that the jewelry might have been exposed to a corrosive atmosphere at some point and doesn’t really mean that the gold in these items are fake. In terms of tarnishing, one’s lifestyle and the environmental conditions in your area can really affect your jewelry.

Treating tarnished gold jewelry
To remove surface tarnishing of your gold jewelry, you can add a few drops of mild, non-phosphate dishwashing liquid to warm water and wipe the tarnished part with the mixture using your fingers or a cotton swab. Do not use toothpaste or baking soda as they are too abrasive. Dry your jewelry with a soft cotton cloth or allow it to lie flat and air dry completely even if it takes overnight and then once dry, you may polish it with a soft cotton cloth or a jewelry polishing cloth for shine.
If your gold jewelry eventually looks dull after a long time of use, you can bring it to a trusted jeweler so your piece can be thoroughly cleaned by an expert. You don’t want grabbing just any jewelry cleaner and end up damaging your precious piece instead of cleaning it. Your jeweler is the best person to give you advice on what to use for cleaning your piece.
-
How to Measure Your Wrist for the Right Bracelet Size
A very famous bracelet in history is the Scarab Bracelet which is one of the most renowned symbols of ancient Egypt. The scarab bracelet represented rebirth and restoration for the Egyptians.
The trick with having the perfect bracelet is its fit,
 making sure it’s loose enough to move and dangle nicely on top of your hand while tight enough for it not to fall off your hand. Ordering bracelets most especially online is much easier if you have the right wrist size. So we’ve come up with a blog that has easy instructions on how to measure your wrist properly and ensure a great fitting bracelet.
For a regular chain bracelet or bracelets with locks
- You’ll need any of these three to measure your wrist. Prepare a flexible measuring tape, a string, or a strip of paper enough to go around your wrist.
- Using your measuring tool, measure just above your wrist bone by wrapping the measuring tape or paper around it. See sample picture below:
Some suggest that, for charm bracelets or other types of bracelets that you want draping across the top of your hand, measure the point where your wrist meets your hand and add approximately a half inch allowance to that. - Mark or take note of the part where your measuring tool overlaps. If you’re using a measuring tape, simply add between ¼ inch and 1 inch depending on how tight you like your bracelet to be. Usually people add half an inch (½ inch) to their actual wrist size for a comfortable fit.
- To get your wrist measurement if you’re using a strip of paper or string, simply lay it flat on a surface and measure the length from your starting point to the end mark you’ve made, and then add to that measurement your desired inch allowance.
I suggest that if this is your first time buying bracelets online, after getting your measurement (using the tape measure or strip of paper) try to experiment on various inch allowances and move it around and up and down along your wrist to ensure you’re comfortable. You can do this by wrapping the measured strip of paper or string around your wrist and taping/joining the edges and see if you’re comfortable.
For bangles
Bangles are rigid, don’t have openings and need to slip through or over the hand onto the wrist. Having bangles that are too large is very uncomfortable with the fear of the bangles falling off your hand while having it too small would be torture whenever you try to slip it on or off your wrist. But there are basically two kinds of bangles, an adjustable one and the fixed size bangle.
For adjustable bangles, you can simply do the regular bracelet measurement stated above. With adjustable bangles, you wouldn’t have to worry that they might slip off your hands so in general, it’s a good choice.
Bangles are measured or sized by their diameter in inches. If you have good fitting bangles already then you can simply measure the diameter of those to find your size, otherwise, especially for fixed size bangles, you’ll need a tape measure or a strip of paper for measuring and here’re what you’ll need to do:
- Squash or squeeze your fingers together towards the center and make it as narrow as possible. Another trick is to squash your fingers together and bring your thumb and your little/pinky finger together towards the center or simply pretend that you slipping a bangle.
- Wrap the measuring tape or strip of paper around the widest part of your squashed hand. As a tip, measure around the knuckles and use the knuckle of the thumb as a starting point, this area around the knuckles is the widest part. Pull the measuring tape or strip of paper just tight enough to pass around this widest part. See picture below for reference:
- If you’re using a strip of paper, mark the part where it overlaps with a pen. Lay down the paper on a flat surface and measure it with a ruler from the starting point to the point of overlap. If it’s a tape measure then simply take note of the measurement. This measurement is the circumference of your hand.
- Once you have the circumference, you have to get the diameter. Tape the ends together (starting point and the point of overlap) and measure across the widest point of the paper bracelet/circle making sure that you are not distorting the circle shape in any way and that is the diameter.
For those with thin wrists, you may want to try a different bangle sizing technique. This can be done by measuring the width of your closed fist from the top center of one knuckle to the other. And then, select the closest bangle size to your measurement. Example: Small- 2 ¼”, Medium- 2 ½”, Large- 2 ¾”. See picture below on how to measure thin wrists for bangles:
Try to slip the paper or the tape measure back and forth to make sure it will fit in through your knuckles to your wrist easily.
Here’s a chart for easier reference for circumference to diameter conversion:Equivalent bangle diameter, measured in inches Equivalent bangle diameter, measured in millimeters Equivalent bangle circumference, measured in inches Equivalent bangle circumference, measured in millimeters 2.125 54 6.67 169.4 2.25 57.2 7.06 179.6 2.375 60.3 7.46 189.5 2.5 63.5 7.85 199.4 2.625 66.7 8.24 209.3 2.75 69.9 8.64 219.5 2.875 73 9.03 229.4 3 76.2 9.42 239.3 Bracelets certainly never go out of style so making sure that it fits just right and comfortably is essential. We at Gift-Junkies hope that this guide to measuring your wrist will help you have a better bracelet buying experience.
Bracelets are great accessories to add to your collection. Its origin can be traced way back to 40,000 BP. The word bracelet is from the Greek word “brachile” meaning “of the arm”. Materials used in ancient bracelets are bones, stones, animal teeth and wood. Bracelets were believed to serve religious and spiritual interest in some cultures, while a class symbol for others. -
Why Does Silver Tarnish?
Why Does Silver Tarnish?
When we buy stuff, we want it to last as much as we can and use it to its maximum lifespan, especially in jewelry. Jewelry may be a necessity for some but for many individuals who work hard to make both ends meet, jewelry is a luxury whether it’s gold, white gold or silver. For some, their silver is a priced possession because it has a sentimental value; maybe it’s a gift from a loved one, a friend, a special someone or an heirloom piece.
Silver, a popular and budget friendly alternative to white gold or platinum is a go to metal for jewelry when you want a glamorous piece without breaking the bank. But as with any metal, silver tarnishes, sometimes quicker than we want or expect them to. Tarnishing especially in something that we wear is not attractive at all and is really annoying. So in this blog, we’ll go through some of the most common reasons as to why our beloved silver jewelry tarnishes.

Tarnishing does not only occur in low purity silver but even real sterling silver tarnishes, on the other hand pure silver is not very reactive and does not react with water or oxygen at ordinary temperatures but pure silver is not sturdy enough for jewelry and for the record, it does tarnish eventually with consistent wear and tear and exposure to high levels of chemicals and/or high temperatures.
Silver tarnish is the discoloration that occurs in items made of silver such as jewelry and kitchen utensils which can be a yellowish tint, deep yellow or black. Silver tarnishing takes place through a range of methods.
Corrosion:
One of the reasons why silver tarnishes is due to the deterioration of the metal in which your jewelry is made. Corrosion occurs under humid or wet conditions. When we sweat, chemicals in our perspiration though may be considered mild is enough to cause corrosion one jewelry metals that we wear especially when supported by warmth and air.
Sterling silver readily corrodes on the skin if there is adequate presence of salt. Remove any rings if you’re to handle salty stuff like chips, salted nuts and when cooking with salt or swimming in the ocean.
Metallic Abrasion:
The use of cosmetics and other chemicals when they come in contact with your jewelry can cause your silver to tarnish or rub off and have spots with black color. Certain chemical compounds present in make up like zinc oxide and calamine may be stronger than the chemical compounds in jewelry and if you can, you should avoid these chemical compounds when purchasing your make up or you may remove your jewelry when applying makeup to avoid some of the compounds from falling and sticking into your jewelry causing abrasion. Your jewelry should be the last thing you put on before leaving the house.
Other Compounds:
The presence of hydrogen sulfide or natural gases in materials that silver comes in contact with is mostly the main reason for silver tarnishing. In general any sulfur containing materials can tarnish your silver and pollution/smoke caused by burnt fuel like coal or oil is a common example. So if you live in areas with high levels of pollution, make sure to clean your silver regularly after use.
Other materials such as wool, latex, rubber bands, chlorine and some paint cause tarnishing. Increased humidity and or elevated temperatures can accelerate and worsen tarnishing.
In terms of food, strong smelling ones like eggs and onions, and oily meals can cause your silver to tarnish. And if you have moist or oily skin, make sure to polish your silver often or you may use absorbent powder in areas where you wear jewelry. In other cases, the wearer’s body chemistry affects and reacts with alloys resulting to tarnishing which also may be possible if you’re taking certain medications.
Your line of job may also affect your jewelry and may cause or worsen the tarnishing process. If you are a photographer who handles photographic chemicals or solutions, remove your jewelry before working on these chemicals. If you’re working on the perfume counter, perfume chemicals may spray on your silver rings or bracelets so be careful when testing perfumes; same goes for the customer if you love buying perfumes.
Our silver items like jewelry will tarnish eventually but knowing the most common reasons why it tarnishes can help us greatly in slowing down the tarnishing process and hold it up for a while. Clean your silver every after use and most especially at the first sign of tarnishing and when necessary seek help from a professional jeweler.


